I Hate Bermuda Gass

Bermuda Grass Taking Over

When we first moved into our current home, we didn’t have the time to work on a nice landscape of our own.  Besides, this is Texas and we were new.

After discussing our various preferences to the landscaper we had chosen,  we turned him loose to prepare a plan, and as it happened, Take care of the landscape job itself.

Big mistake!

In the areas we had selected for some grass, he had specified Bermuda grass, as it is very heat tolerant and drought tolerant, both very important characteristics for a lawn in Texas.

At the time, I didn’t know but later discovered that while all these great characteristics were true, he left one out –  it is VERY invasive.  In some areas it is banned because of this.

Anywhere something met the edge of the Bermuda grass, it was overtaken by the Bermuda Grass.  Borders, Stone Edges, Walkways –  everything became a bed for Bermuda Grass.

Even a gravel pathway to a small alcove at the back of the lot became tangled with Bermuda grass.

And it’s almost impossible to kill.  Even Chemicals only upset it for a short time.

Bermuda grass spreads three different ways

  1. Seeds
  2. Stolons
  3. Underground Runners

Stolons are horizontal runners that are actually part of the stem.  They attempt to root themselves as they travel along the surface, crawl through rock cracks, etc.

Underground Runners are basically the roots that do pretty much the same thing the Stolons do, but do it underground making them difficult to find.Bermuda grass taking over a Raised Bed

Take a look at the picture.  One is a raised Garden bed made of dry stacked stone wall, and the  other is a patch of lawn we couldn’t get at with my riding lawnmower.  After I trimmed with a string trimmer, I covered in cardboard and newspaper, and then covered with a few inches of mulch.

Didn’t even slow it down

“Well, what do you do then, Steve?”

According to the research I did, both online and in print, the best way to fight Bermuda Grass is to remove it.  Completely remove it.

And the best way I have been told is to Solarize it.

First we need to trim the grass as close as we can with a mover or string trimmer.  In this case I’ll have to use a string trimmer.

Next I can either dig the soil up being sure to include the roots, or cover the area with some clear plastic sheeting for a few weeks or months.

I plan on solarizing some of the worst areas through the winter and see what it looks like in the Spring.  If that doesn’t do it, I guess I’ll have to dig it out.

I’ll photograph the process for you to witness

Stay Tuned

Growing Giant Watermelons in Texas

Big Melon

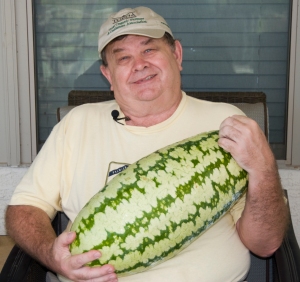
30 Lb Watermelon

In an earlier post I discussed how I experimented with a simple compost bag planter in the garden.  In it, I dropped a bag of commercial compost on the ground, cut off the top, and dropped a couple of Watermelon seeds in the mix.

Little did I know how successful it would be.

I watered the plants through my drip system, but beyond that I left them alone to grow.  The result was a 27 pound, 14 Oz Melon you can see in the picture.

The point of this experiment was

  1. Show how you don’t need to have a extreme garden in place to grow good food.
  2. Show much a good soil will do for your existing garden.

Frankly, I was surprised at the size of the melons harvested, So far I have harvested in excess of 100 pounds of watermelons from the single plant.

The best part is this is an heirloom melon known as a “Georgia Rattlesnake” so I will be able to save seeds from this plant and grow even more next year.

 Melons really do well here in South Texas, apparently because of all the heat we have here, and produce some of the finest watermelon flavor I have ever had.

For video details, take a look at the YouTube Video I made of the process at CooksGarden YouTube Channel

Try it sometime.

Growing Experiment

Small Space Watermelons

After hearing from so many people I knew that it is so much work to start growing your own food, I decided to prove they were wrong.   I continually hear “I don’t have the space” or the “Ground is too hard”, ( well it is here in South Central Texas).

So I came up with this experiment after reading of a similar method in Mother Earth News.

In late April, after choosing what I wanted to plant I bought a bag of good compost, and threw it on an unused part of my garden.  I then cut most of the top of the bag off, and planted a few watermelon seeds.  In no time they began to grow and I thinned them to 2 plants, one on each side of the bag.

As you can see from the picture above, they are doing very well in our Texas heat, and should produce several good watermelons.  All in a bag of compoist.  The fence in the background is to keep the deer out.

So the next time you think you don’t have the space or there’s too much work, come on back and take a look at this watermelon plant.  Later, as they near harvest, I’ll post some more photos to show you what can be done in a simple sack of ….. compost.

Beating Bambi

Texas Windmill

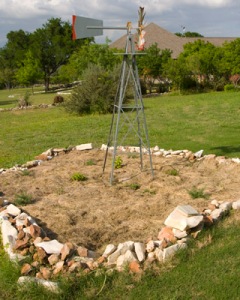
Windmill Planter

Farming is not all about raising produce.  Sometimes, I get into a little landscaping too.

I live in the Texas Hill Country, approximately mid way between Austin and San Antonio.  It is an area known for soil of a type called caliche which is a very hard limestone based element.  As a result, there are a lot of rocks around here.  Early settlers and current home owners use them heavily for landscaping walls, lining driveways, etc.

Last year, I planted some Black Eyed Susans in this planter, forgetting that deer are everywhere and will try and sample anything.  See post about “Where Bambi Goes, Nothing Grows.

So this year I decided to try something new.  Last Fall I heavily mulched the planter with plain old grass clippings.  I don’t use chemicals so it is save.  I did this for two reasons.  First and foremost was an attempt to control the Bermuda Grass we have here that is more like a weed.  Dang stugg will take over anything if left alone.  You can still see it trying to break in along the base of the planter ( bottom of the picture).

Although it’s hard to see from the photograph, I then planted some various herbs like tarragon, parsley, Basil, Sage, thyme, etc.  But I circled them with several Rosemary plants which I have discovered they don’t like due to the aroma.  Hopefully the Rosemary will camouflage the other herbs   I wanted to try this technique after discussing it with one of our local Master Gardeners who thought it should work.

The green spots around the bottom of the windmill are the various herb plants I am trying.

We’ll see if the Master Gardener was right

Why Born To Farm?

I chose the name “Born To Farm” for this blog because of my attitude and dreams, not because I am currently on a large production farm of any sort.  Our current property is only around an acre and a half or so in South Central Texas just a bit North of San Antonio in the Hill Country.  But it does keep me almost as busy as a larger farm.

However, my wife & I have purchased 6 acres in Northern California ( near family) in the heart of agriculture country.  One of the benefits of the current problems in California is how inexpensive some of the real estate has become. 

In 3 years or less we will be moving there and building as completely self sufficient farm as we can.  Our intent is to incorporate Solar Electric Generation, Wood Heat, and possibly Wind energy.  These will be our main forms of energy, and we will rely on Municipal Water and power as auxilliary sources, not as primary sources.

So why the big deal over what I am doing here in Texas now?  After all, I still have a day job and a commute like so many others.

The reason is to begin practicing and learning the ins and outs of organic farming practices on a small scale where I can learn and make mistakes in plenty of time to correct them.

I guess a better term for the present situation might be “Urban Homesteading”, but whatever you chose to call it, it is a very enjoyable way to learn how to be self sufficient.

I started with just a simple container on the patio, that grew to a large garden in the back portion of the property. Since then I have branched into many other subjects that will be needed such as underground irrigation, composting, the importance of mulch in weed control, landscape pruning, and organic pest control.  Here I am 2 years later and my patio now contains citrus trees that provide us fruit for meals and slaads.

So whether you want to call it a farm or an urban homestead, the purpose is the same – to be as self sufficient as possible while at the sametime minimizing what we need from the local government.

I want to share what I have learned for others who may be traveling the same path ( or want to)

There is so much to learn……

First Plants of the Season

Well, 2010 is already off to a bang.  Since the weather has finally improved and gone back to normal ( Highs in the 60’s and lows in the high 30’s, low 40’s) I was able to bring out some of the cabbage starts and get them going.

Although the weather has been terrific, the birds were pretty vicious last fall on my starts so the white fabric you see pulled back is my Agribon Floating Row Cover.  Right now it’s just flat over the raised beds, but I do have a low tunnel frame bender on order from Johnny seeds.  This will help me bend plain old electrical conduit into hoops which then go into the ground and support the covers at a higher position.  In the Fall, I can use them for plastic covers and harvest through the winter.

Cabbages - 2010

If you haven’t looked into row covers, they are pretty amazing.  I read about them first in Elliot Coleman’s excellent series of books on All Season Vegetable growing.  If you haven’t read them, you really need to have a look.

Not visible since I just planted then today directly are a couple of rows of Nantes Carrots.  I love carrots, and we just can’t find them very large or very good in the stores here.  I plan to freeze them as I mostly use them as ingredients or in mirepoix .

Tomorrow I plant peas, so I am trying to decide on the trellis structure I want to use.

The New Seed Starter Rack

Living in Texas does have it’s advantages.  I am in Zone 8b which gives me a nice long growing season.  However, it is not without it’s challenges.

A normal winter around here might see a day or two in the upper 20’s, and then start warming up.  ( Remember the months of temps in the 100’s last summer?)  But this year threw us all a curve.

On January 8th, 2010, the low in the area I live in hit 16 degrees fahrenheit!  While this doesn’t mean much to my friends up North, we don’t generally expect to be able to freeze the beer on the back porch.  Some members of the Texas Organic Farmers and Gardeners association reported temps much lower than that.  It was a real good lesson on the benefits of row covers and double layers of covers.

Cheaper than the commercial Racks

All that cold makes it hard to believe that here I am today, it’s sunny outside, the Temps in the low 70’s, and I have a serious case of cabin fever ( ground is still to damp to work).

After going through all the seed catalogs I showed you last time, I figured I better get going on my grow rack.  Last year I got started late so I only had one light under a cabinet in the garage.  This year I wanted something better.

After I looked at grow racks available through the online sites I was shocked at how much they charge for them.  I didn’t have time to build a complete rack from spare lumber so I looked around a bit and found a perfect rack at Sams Club nearby.

Cost of the rack was only $80 for a 6 shelf stainless steel infinitely adjustable rack, and another $20 for two light fixtures and I was ready to go.  I already had the electrical stuff  like Electrical plug strips and a nearby AC outlet so I was ready to go.

As you can see by the photo, all I had to do was assemble the rack ( no tools needed) and hang the fixtures.

I would recommend picking up some additional small chain though so you can get more adjustment length from the lights.  If you want more space for growing, it is easy to simply leave out or adjust one or more of the shelves for more room between shelves.

Easy way to Hang the Grow-Lights

If you look at the yellow arrows in the photo to the left, you can see all I used  to hang the lamps were two small S-Hooks, one on the lamp itself, and the other fit perfectly over the wire portion of the rack shelf.

It does still get chilly at night though, so I also have a “heat-mat” for each shelf of the planter I intend to use.  These will keep the roots nice and warm while growing. ( Not Shown)

Last Frost date around here is March 20th, so I’ll be starting my Tomatoes and Peppers in another week or so.

Talk about Spring Fever!  I can almost taste those Veggies now

Time to Get Back To Work

It’s a new year now, and all the crops of 2009 are nothing more than history.  Many parts of the country are under several feet of snow and extreme cold.  Fortunately, here in South Texas, I can’t complain too much.  Especially with what is happening now…

When you were a child, remember how exciting it was to receive Christmas catalogs from the big stores like Sears and Montgomery Wards?  I sure do.

Here I am much older now, and yet something happens this time of year that gets me ( and most gardeners) just as excited as the full color glossy Christmas catalogs we salivated over as a child.

Seed Catalogs!

Besides helping get some ideas for new crops, they are loaded with information on planting, growing, and harvesting crops I have only read about before.

I also made a decision this year to use only Open Pollinated or Hybrid plant Seeds so I can save my own seeds and see how that goes.  Catalogs generally note which varieties are Hybrids, and which are open pollinated.  Sometimes this is done with simply “F1” by the variety name.

This season, I have decided to focus on Tomatoes, Green Beans,  Shelling Peas, and some experimentation with Sweet Corn and Watermelon.  Oh, and of course, some Hot Chile peppers!  This is Texas after all.  For a Spring Crop I plan to be growing many of the staples like lettuce varieties and carrots.

Next time I’ll show how I made my new Grow Lite stand, with a substantial savings over a commercial grow light stand.  It’s easy and you can save some money on your own.

See you next time, I have some catalogs to read!

How to Beat the Drought

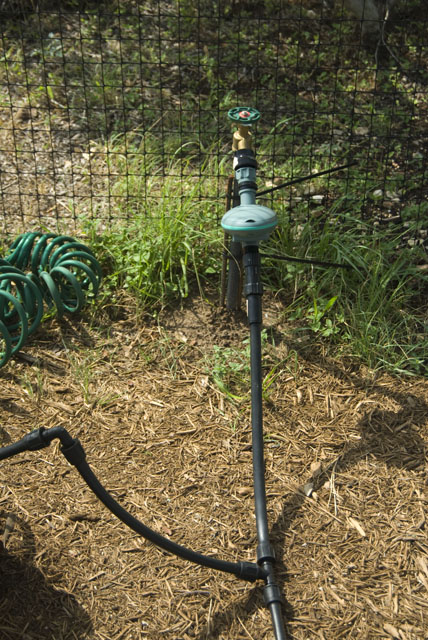
Drip Command Center

Drip Command Center

One of the ways I have attempted to beat the drought here in Texas is to install a drip irrigation system.  With the addition of an inexpensive timer and some drip hose thanks to DripWorks of Willits, California (http:\\www.dripworks.com ) my vegetables get the water they need, when they need it.

When I first set up the raised beds, I was watering by hand which got old very fast.  Howver, there was a surface sprinkler installed by the developers that I had shut off.

I dug out and capped all the other prinlers on this line, and for the main control, simply brought a section of Schedule 80 PVC to the sureface where I attached a Hose Bib.

From the hose bib I added an inexpensive valve and ran the 1/2 inclh line around the beds as needed.

Once I had it finished and checked out, I was able to take a little vacation to the Desert ( Big Bend, Texas) and enjoy myself without worrying about the plants dying.

As you can see from the meolons in my previous post, they are apparently pretty happy too.

I am a big fan of drip irrigation now, and although I can’t prove or deny it, I am reading claims of 70-80% less water usage too.

Since I don’t have a private well yet, my water bill can use the vacation too.

Melon Surprise

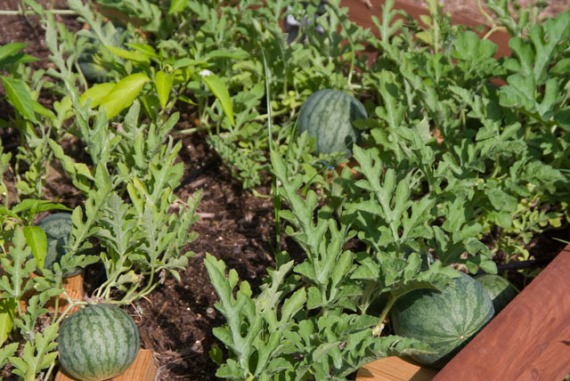
Icebox Watermelons in a raised bed.

Icebox Watermelons in a raised bed.

With the length and intensity of the drought we have experienced this year, My expectations of the crops have been quite low.

But I one crop that has surprised me by it’s productivity is the “Icebox” watermelons I planted as an experiment this year.

Even with more than 45 days of high temps in the triple digits and very little rainfall, these beauties have continued to grow and thrive.  At last count, I am getting about 8 or so melons per plant and they are still flowering.

The only fertilizer given them has been a fish spray once a month or so ( I am trying to stay organic) and it appears to have worked.  I found out earlier this year that insecticidal soap is as bad for the plants as the insects once the temps get much over 85 with humid conditions.  But that’s another story.

Another change I made this year that I believe has made a lot of difference is my installation of a drip irrigation system.  More on that on another time.  Suffice it to say I am looking forward to some nice watermelon to beat this heat.